
Revit Families
Understanding the View Template Revit Feature

Mar
Understanding the View Template Revit Feature
Revit is a great software program to create complete sets of construction documents (CD’s), which need to be as clear and legible as possible to avoid mistakes in the construction stage. Creating a clean and legible drawing might seem a simple task that only requires a few minutes, but in reality, it is a task that requires analysis and some testing before calling it done.
Each type of drawing (plans, elevations, sections, etc.) requires different graphic treatments (lineweights, linetypes, hatches/fills, colors, shadows, lighting, scale, model display, etc.), which ensure that the viewer focuses on the parts of the drawing that really matter, avoiding any possible confusion.
Revit is great at doing this, in fact, by using Revit “straight out of the box”, our drawings will look decent enough, but still, some level of customization will be needed depending on the type of drawing we are working on. To customize our different drawings, Revit offers many options: some that work across all views automatically (through Object Styles, Edit Type), and some that are view-dependent (through Visibility Graphics Overrides, view control bar, properties). The former will get us in the ballpark, but the latter will make our drawings clear, legible and unique.
To explain this a little better, let’s take furniture as an example (although there are many other examples where this can be used). The lineweight and color of furniture can be configured in Object Styles (VV – Object Styles…). The color and lineweight that we choose for furniture in Object Styles will apply to all views in the project, but in reality, we don’t want furniture to look exactly the same in all views. For example, we might want furniture to be lighter and with a thinner lineweight in reflected ceiling plans (RCP) so we can visually focus on the ceilings while still having a visual reference of the location of furniture in the view. To make the furniture thinner and lighter in the RCP, we have to customize that specific view using Visibility Graphics Overrides. These changes will only affect that specific view, so in case we have many views of the same type (many RCP’s, for example), we would have to do this process for each RCP manually.
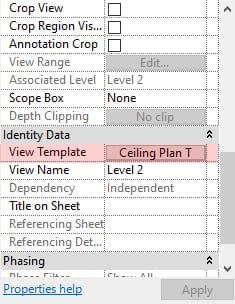
Luckily for us, the view template Revit feature is the solution to this problem. Once we customize the view and make it look the way we want it to, we can create a new view template based off of that view and give it a name (Ceiling Plans Template, for example). This template can then be applied to other views by opening those other views and selecting it from the Properties panel, avoiding the need to do everything manually again for each view of the same type. While the example given here is a simple change that we can still do manually fairly quickly (even if we had several views of the same type), usually we change more than one thing in views to customize them, so the use of view templates becomes an absolute must if we want to streamline our design workflow.
Keep in mind that View Templates override everything in the view, so if you are using a view template, you won’t be able to change anything in that view (anything that was configured in the template), unless you change it in the template itself, which would then be applied to all views using it automatically.
View templates are created once (they can even be stored in a Revit Template file –.rte file – so you can easily reuse them in every project) and they can include other parameters like: display model, detail level, scale, lineweights, colors, patterns, transparency, model display, shadows, lighting, view range, orientation, filters, and more.
View templates are a great way to speed up our work in Revit and a great way to keep all your drawings consistent/standardized, either according to personal, studio or international standards, so make sure you spend enough time configuring them the first time; your clients, colleagues, contractors and everyone involved in the project will certainly benefit from them.